Sunday, February 20, 2011

Have you ever poached an egg? You really should.

I remember with much fondness the first time that I tried eggs Benedict. Our team was on a trip to somewhere in central Arkansas for a high school debate tournament, and for whatever reason, we were staying at a pretty nice Hilton Hotel. In the morning, we had a sit-down breakfast, and I had no idea what to eat (a common problem for me at unfamiliar restaurants). My friend JP convinced me to try eggs Benedict, and I went for it.

A delicious eggy on toast.
For those unfamiliar with this dish, it's fried Canadian bacon, a poached egg, and Hollandaise sauce, all on a toasted English muffin. Oh, what flavors I had been missing! Hollandaise sauce, accurately described by JP as "the nectar of the gods," was one of the best things to have graced my fairly inexperienced palate.

What's more is that it was one of my first forays into the world of runny eggs. My view of eggs has changed drastically throughout the years. I used to absolutely hate the things. I thought that egg yolks were meant to be cooked through and that people who ordered them "sunny-side up" were lunatics. Now I like my yolk slightly runny so that I can mix it in to my hash browns or other delicious items on my plate.

Warning: eggs Benedict is a stove-consuming task.
Butter, water for poaching, pan for frying bacon,
and a double boiler for Hollandaise sauce
In any case, as promised, I'm talking about poaching eggs in this post. Some might be asking: what the heck does it mean to poach something? Well, you pretty much just cook it in hot liquid. It can be broth, milk, whatever, but in this case we'll use just water. So, why poach? Well, not only will you get some sweet elephant tusks out of the deal, but it's also a healthier way to cook your eggs. You can cook to any completeness, though I'd recommend a little runny yolk...unless you're pregnant or have some sort of autoimmune disease.

I'll go over one method of how to poach an egg (not hard), and then give a good recipe for eggs Benedict. While just eggs are good for any quick meal, I'd highly recommend going all-out with the recipe if you have the time. It's quite delicious. Also, it's a highly variable recipe, so find something you like and go with it.

Ingredients (Show/Hide)

Whole eggs (for poaching)
English muffins
Canadian bacon

Hollandaise Sauce
3 large egg yolks
2 tablespoons water
10 oz. butter
1-2 teaspoons lemon juice

How to Poach an Egg (Show/Hide)

This is just one way to do it, but as you'll read on any guide to poaching, the fresher the eggs, the easier the process and the better the outcome.
  1. Put some water on medium heat in a saucepan until it reaches around 175-185° F. If you don't have an immersible thermometer, either invest in one, or wait until you see tiny bubbles starting to form on the bottom of the pan. Then turn it down just a bit more and you should be in the right range. You do not want the water to be boiling.

  2. Add a couple of teaspoons of white vinegar to the water if you have it, unless you're using super-fresh eggs. This will help the albumin (the protein in egg whites) to coagulate a little faster and stay together a little better. If you don't have any, don't sweat it.

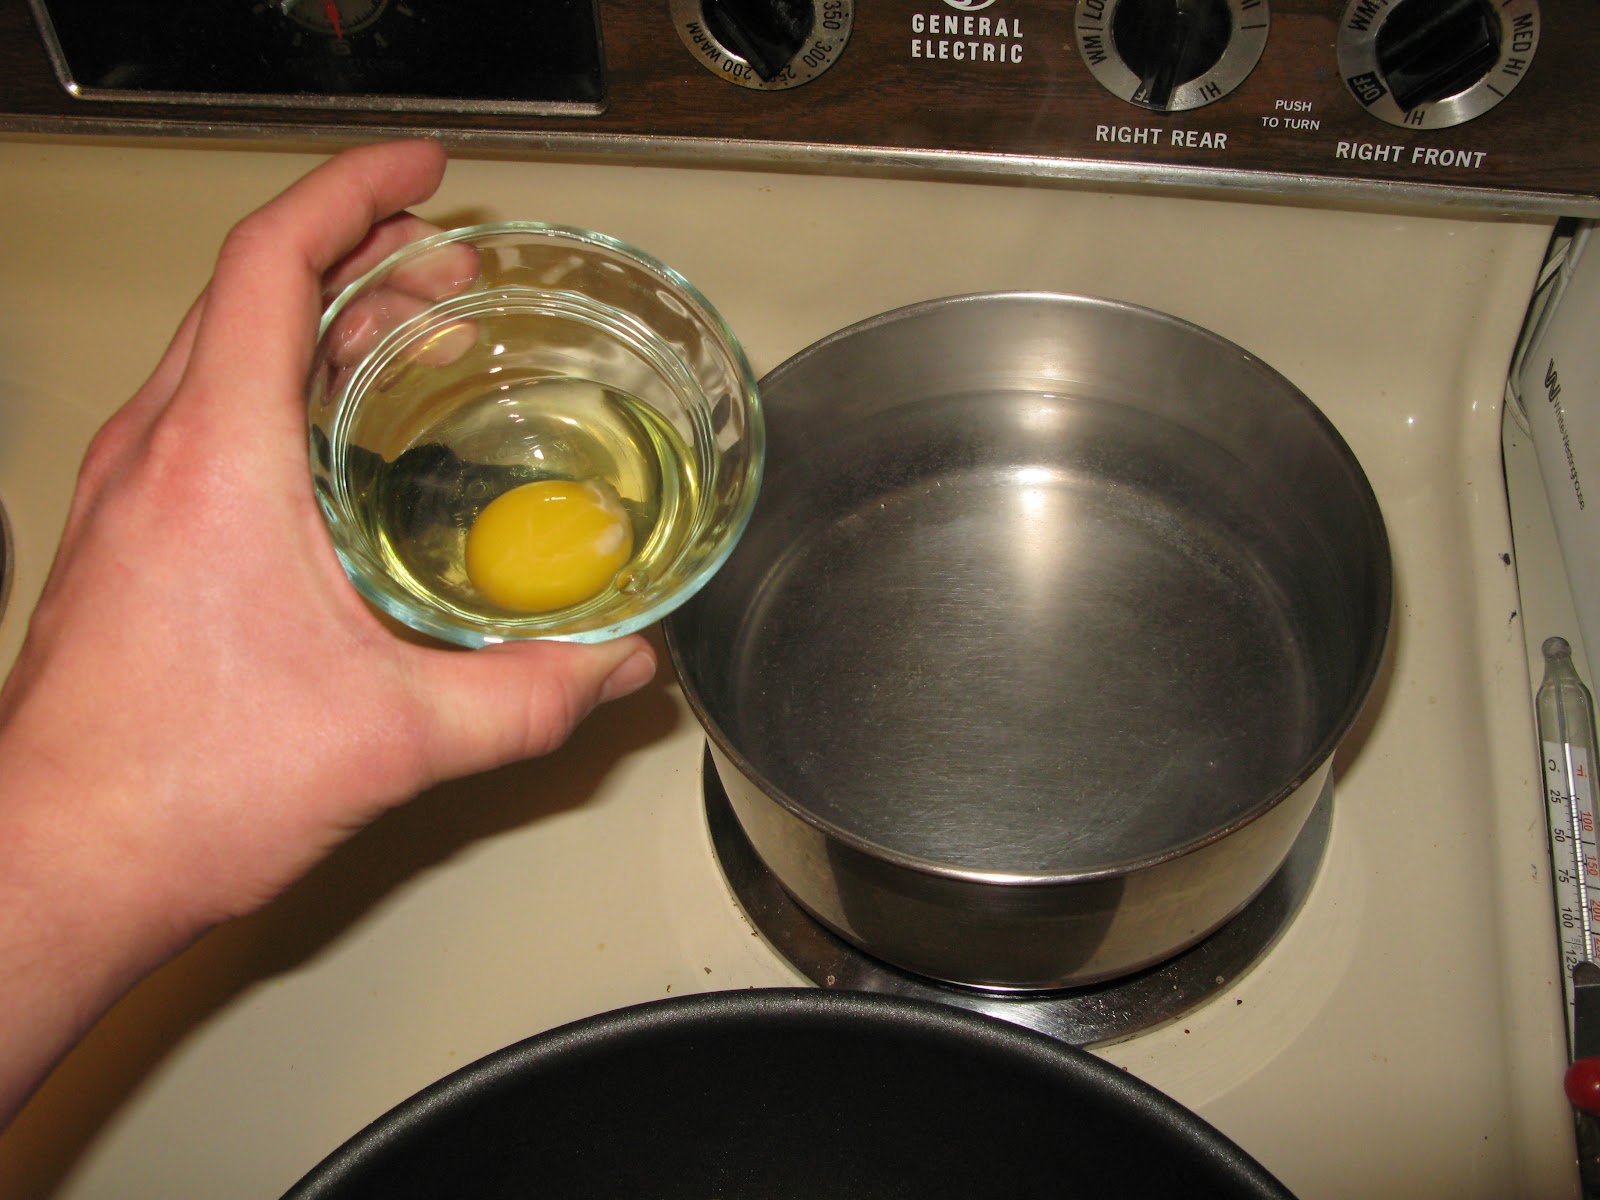
  3. Prepare an egg by cracking it into a small glass dish of some sort. I prefer a ramekin, but you can use a mug or small bowl - whatever you have available. This makes it much easier to drop into the water while keeping the egg together.

    An egg in a ramekin, ready to drop
  4. Gently drop the egg in the water. It's really more like a gentle placement - I even let a little water flow into the ramekin before I fully upturn the dish. Figure out what works best for you so that the egg stays as together as possible. (If you're really all about form, you can even gently swirl the water before putting the egg in. If you do it right, this will help the egg white stay in the center of the pan instead of spreading out all over the place. Do it wrong, and it will spread out all over the place. I personally usually do without.)

  5. Wait about 30 seconds, then gently make sure that the egg isn't stuck to the bottom. Let it cook about 3 minutes total for a fairly runny yolk, longer for a bit firmer. The white will still be fairly jiggly, but will still be cooked through. Do a couple and you'll get the feel for what you like.

Hollandaise Sauce (Show/Hide)

This stuff is so good. It's basically an emulsion of butter and egg yolks with some lemony zing to it.  After reading more websites about Hollandaise sauce than any person should, it seems that many prefer using clarified butter for their sauce. This makes sense to me, because the sauce is rich enough as is and doesn't need any more creaminess that the milk solids would contribute.

  1. Start by heating some water on medium low to use for a double boiler.

  2. Make some clarified butter. To do this:
  3. Skimming off the whey protein. Not perfectly
    clear, but it doesn't need to be.
    • Heat up about 10oz unsalted butter in a small saucepan (yeah, that's about 2 and 1/2 sticks) on medium heat.
    • When melted, turn it off and let the butter separate for a few minutes; then, tilt the pan and skim off the foamy whey protein. Decant the clear liquid into a small bowl or dish (or again, ramekins are great here), being careful to avoid the fat solids at the bottom of the pan. Allow it to cool while you continue the rest of the recipe.

  4. Separate three yolks  from the egg whites. This is most easily accomplished by hand instead of the back-and-forth method in the shell, because doing it with your hands eliminates more egg whites, which is important for this recipe. You can do with the egg whites what you wish (perhaps some meringue cookies).

  5. This is what it should look like on the
    double boiler - nice and thick.
  6. In a metal mixing bowl off the heat, whisk together the 3 egg yolks and 2 tablespoons water for three minutes or so. Try to incorporate lots of air.

  7. Put the bowl on the double boiler, and whisk constantly from here on out. You do not want the eggs to start cooking. Rather, you want the heat to slowly thicken the eggs until the whisk leaves trails that last for multiple seconds. When it gets to this point, which should take several minuts, pull it off the heat (but keep whisking)!

  8. Slowly add in the clarified butter (which should be just somewhat warm at this point), just a bit at a time, whisking all the while. Keep mixing until all the butter is incorporated.

  9. Then, mix in the lemon juice. I don't like any more than 2 teaspoons, so start with one and add more to taste. Add salt and a bit of pepper.


Assembly is easy enough (start frying up some Canadian bacon while you're whisking the sauce for an eternity, and throw an English muffin in the toaster towards the end of the process), but having everything come together at the right time at the end can be a bit tricky. As you can see, it's a full-stove operation! Mad props to my brother Eric for his many minutes of whisking while I poached eggs and took pictures.
Lackluster photography skills. It looks lonely...
...but deliciously so.


So, go on and try it. Poaching is a delicious and healthy way to make an egg, and Hollandaise sauce is a delicious way to counteract any health benefits. Mmm.

Next time, I'll probably take a look at wilting greens, a method I'm pretty sure I've never tried.

Monday, February 14, 2011

Happy Singles Awareness Day! Here's some cake.

(A note: this is a somewhat hacked-together post (with not many pictures, as I forgot to take many). I'm still working on formatting and what I even want this thing to be, so bear with me and my messy recipe directions.)

Well, okay, I didn't make this specifically for Valentine's Day, it just happened to end up that way.

Don't tell me you don't want any.
 So, a couple of weeks ago my brother Tyler sent me a recipe for Chocolate Mint Torte he had just made.

A little history on our family will be helpful here. We kids all seem to be at least a little bit culinarily inclined, undoubtedly due to the influence of our mother. Each child had a duty for dinner each night, but the rotation of these assignments was controlled by the dreaded chart on our fridge. Each day as I'd get home from school, the chart would determine my mood. "Dinner helper?" Screwed. You were stuck with the most responsibility out of anyone! It meant less outside play time and more time in the kitchen.

Of course, I now recognize what a blessing it was, and you can bet I'm going to do the same thing to my kids. Preparing food changed from a chore to a habit, even a hobby. So, when one of the siblings finds a good recipe, successfully bakes something, tries a new technique, or buys a new piece of kitchenware, we usually tell the others of our endeavors. It's this spirit of sharing that most often compels me to try new things (and that drives us to do things like make a Turducken when we're together over the holidays).

So, all of this is to say that when Tyler showed me the link, I knew that I would have to try making it myself. Lauren was kind enough to help me out with this one. So without further ado, I present:

Chocolate Mint Torte, or: 
"I am drowning my sorrows in chocolately goodness."
Adapted with thanks from King Arthur Flour

Show/Hide Ingredients

Chocolate Cake Batter
4 large eggs, room temperature
3/4 cup granulated sugar
1/2 teaspoon salt
1 teaspoon vanilla extract
2/3 cup all-purpose flour
1/3 cup cocoa
1 1/4 teaspoons baking powder
1/4 cup vegetable oil
6 tablespoons buttermilk

Mint Filling
1/3 cup granulated sugar
2 cups heavy or whipping cream
3 to 4 drops peppermint oil (or 1/2 teaspoon extract)
1 to 2 drops green food coloring
A little shy of 1 tablespoon corn starch

Ganache filling and topping
1 cup chopped semisweet chocolate
3/4 cup heavy cream

Part 1: Make a Sheet Cake (Show/Hide)

Step one: Make a sheet cake

Oh wait. No. First, don't forget to turn the oven on. 350°. Grab a jelly roll pan (10x15; you can use a 9x13 or a half sheet pan, but your cake will be a little more thick or thin, respectively) and cut some parchment paper to fit the bottom. Grease the pan, lay the paper in, and grease the paper itself.

(Note: I actually used enough parchment paper so that a good inch was sticking up from either long side. This makes it SO much easier to transfer to a table or cooling rack after baking because you can just use them as handles. Just be sure to crease the parchment paper with your fingernail so that it lays flat on the bottom.)

In a separate bowl, mix your sugar, salt, and vanilla. In yet another bowl, mix your flour, cocoa, and baking powder. (You can wait and use the same bowl as the sugar, if you want - personally, I like having everything ready to go. It just depends on how many dishes you feel like doing.) You'll want to sift these as much as possible, using a fine-wire sieve or a food processor (on pulse) if you don't have either of these. Clumps are no bueno. Lastly, in a cup or smaller bowl, mix your buttermilk and oil. Keep all of these nearby.

Take your eggs (room temperature is best - no worries, leaving them out for a few hours won't hurt anything) and mix the ever-loving crap out of them in a fairly large bowl. They should become pretty foamy.

Pour the sugar mixture into the foamy eggs and continue to beat until it forms a thick foam. It should drip in a fairly thick stream and leave trails in the mix.

Now, fold in the flour mixture into the egg/sugar mixture. Remember to fold and not just mix vigorously, because you don't want to deflate the airiness of the eggs you just spent so much time on.

Lastly, whisk together the oil and buttermilk and add it to the bowl. Mix together gently, then pour in your pan and spread to the edges. Bake for 10-12 minutes, though it may very well take a bit longer. Watch for it to pull away from the edges of the pan and to spring back a bit after being lightly pressed. Be sure to rotate the pan halfway through baking. When done, let it cool for a couple of minutes in the pan, then transfer to a rack or table.

(Being somewhat of a foodie can be difficult in college because you're bound to working with what you have. Sure, you learn to be resourceful, but crappy bake ware can also just mess up your food. So after the first sheet cake was done baking, I realized - the stupid jelly roll pan had bowed, and I was stuck with a very uneven sheet of cake. I tried to compensate on the second one, but even that was a bit lopsided. Oh well. They get quartered up and stacked on top of each other anyhow. Just don't forget to rotate!)

Part 2: Make Ganache/Creme (Show/Hide)

Step two: Make the ganache and mint creme

While the cake is cooling, you'll want to make both of these. I would highly recommend doing the ganache first (easy enough, just combine broken-up chocolate and cream, then microwave until it melts, stirring all the while) because after making it, you'll then need to stick it in the freezer to let it harden up. Depending on how hot it got in the microwave, this could take upwards of 45 minutes. Pull it out when it reaches a little thicker than Nutella-like consistency.

Now that that's cooling, it's time for the mint creme! It's pretty much like making regular whipped cream, except you use some corn starch to keep it from weeping.

This is best achieved by heating up just a bit (maybe half a cup) of the cream and the cornstarch in a small saucepan. Bring it barely to a boil and immediately pull it off. This will help the cornstarch thicken up the cream (and you'll notice very quickly). While that is cooling, begin beating the remainder of the cream in a medium bowl, adding in the sugar, extract, and coloring as you go (I added slightly more mint in mine). When you start getting soft peaks, add in your cornstarch mixture, so long as it has substantially cooled off. Beat until peaks are stiff.

Note: It may sound very obvious, but you do NOT want to add the cornstarch mixture while it is still hot. I made this mistake when I tried to rush the making of a second batch. You end up with what looks like cottage cheese because your cream separates due to the heat. So, don't do that...unless you like minty cottage cheese.

If you've timed this fairly well, your ganache should be properly cooled, so it's time to layer. If you didn't time it well, try to keep your creme cold and then give it a short whipping just before using. Warm whipped cream is not ideal and will lead to very messy layering.

Part 3: Layering (Show/Hide)

Step three: Layering
Trim the edges of your cake and cut crosswise into even quarters. Slather about a fourth of the ganache onto three of the quarters, then using a pastry or sandwich bag, load up your creme and pipe a few thick rows on the same three. Don't be afraid to use a pretty good amount.

Then, stack 'em up, and press down gently to help them stay together. Wrap in plastic wrap and press down a little more to help distinctly show the layers. Again, be gentle. You're not trying to force out all the layers you just made.

Freeze for at least a couple of hours. When ready to serve, let it thaw for 15 minutes or so, or throw a slice in the microwave for 10 seconds. Heat up the remaining ganache and drizzle that on there. Serve and enjoy.

Numerous people from church seemed to enjoy this, so overall I'd consider it a success. Next up: poaching eggs and eggs Benedict!

Tuesday, February 8, 2011

I'm finally like everyone else...

...Because I've made a blog.

However, I'm going to try to not fill it with just the inane happenings of my days or my deeper thoughts on "the issues," because if those things aren't even entertaining to myself, why should I expect anyone else to derive enjoyment out of them? Sure, sometimes I'll talk about stuff going on in my life, but I'd rather it not be my main topic. At least, not for now.

So instead, I've turned to something universal, and something with which I'm fairly well-acquainted: food! Not only is it one of the few ubiquitous human experiences, but it is about as infinitely variable as a thing can get. Perhaps that's the draw to food for me. Dishes can be as elaborate or as simple as you desire, and both have their benefits. Food fits any mood or celebration, and any time of day.

Plus, it tastes really, really good. Most of the time. Hopefully.

In any case, I've made this mostly as a way to channel my culinary creativity, as well as to provide a log of things I have made and plan to make. I already know that I'll enjoy it, and if someone else happens to get something out of it, then that's just fine with me.

In fact, if there's anything in particular you've ever wanted to learn about a particular food or technique, I'm more than willing to be a guinea pig and try it out. Just let me know what it is, and I'll gladly research/buy/bake it. Om nom nom.